As is the case with every piece of software you use: you’ll only enjoy it as much as to the extent you actually understand the functionalities it offers. That’s exactly why we are starting this ‘PIM Expert: how to” blog series: to make sure the users of our PIM platform get the absolute most out of their PIM.
Our customers know: when publishing product information to GS1 or any other data pool, one of the crucial steps is validating your data with the GS1 data standard. This is important because you can only publish your data from SRC-PIM to a GS1 data pool if your data is GS1 compliant. This way, you’re preventing a lot of unnecessary time lost by going about the reactive process of sending and receiving your product information and the corrections to it back and forth, over, and over, and over again.
That is why the validations are always visible to users in SRC-PIM. When certain data is incorrect or missing for an item, those validations indicate exactly which fields need to be adjusted. Thanks to the hyperlink in the validation notification, the user is linked to the field that needs to be completed or corrected.
SRC-PIM thus automatically validates the items in the catalog associated with the installed data models. On top of the GDS validations, this can also be customer-specific validations. The validations are visible per item in SRC-PIM in the validation screen at the bottom and in the column “validation status” in the item list.
When there are many incomplete articles, it can be difficult to gain insight, because of the larger number of validation errors. We often see that many articles are looking incomplete, but the number of different errors is limited. This can be solved quickly by the means of a mass update.
A validation report can be made to gain insight into the missing or incorrectly completed fields. This way you can see in one handy overview of what information your items are missing.
Creating and understanding the validation report in 3 simple steps

Step 1: create the validation report
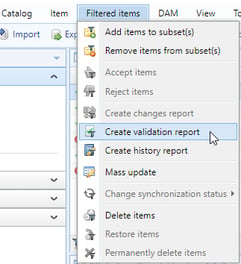
In your SRC-PIM environment, navigate to “Filtered Items”. Below you will find the action “Create validation report”. Click here. You can optionally activate a filter on, for example, the incomplete items. The report is now generated for you.
Step 2: request the validation report
Now go to the task screen. Here you can request the report, download it to your PC and open it in Excel. Then you will see a spreadsheet like this:

Step 3: Understand the validation report
The Excel document shown above shows all validation notifications for all items. The validation group is shown in column B and the validation rule in column C.
Now we can start filtering on these columns in Excel to get an easier and quicker insight.
After looking into the report, we can determine whether we can resolve the current errors via a mass update. This way we could have all of our items completed quickly. So how do you do a mass update? You can read all about it in our next blog!
Need help creating a validation report, or are you getting errors you don’t understand? Then contact our Helpdesk now and they will be happy to help you. You can reach our Helpdesk via helpdesk@src.nl or 0229 233 154.